Sunday, April 28, 2013

Scrapmatts Monthly Reveal

It is time for my monthly reveal over at Scrapmatts Australian Chipboard, and I have a few projects that I would love to share with you. The first one is a gorgeous little chipboard curio cabinet. Scrapmatts released lots of new chippies in March and one of them was this little curio cabinet. When Sofie said that she was sending each of the DT members one, I was overly delighted, because I just love little nooks and crannies and it was right up my alley. When I was young, my grandfather would create miniatures to sell and I loved helping him find little treasures to tuck into them. One of my Fav things to do with him was to walk down in the holler to the dump that the "city" folks had made to dump their old items that they no longer wanted in. Yes, their trash was our treasure, and I loved digging through that dump and finding those coveted items, and some of my best memories where our adventures to and in that "trash" pit. So yes, I am a bonified dump diver-lol!!!

By the way, if you are looking for something unique for a Mother's Day gift this little cabinet would make a wonderful gift to remind your mother of days gone by. You can tuck in lots of treasures, even ones that were collected as memories of your time with her.


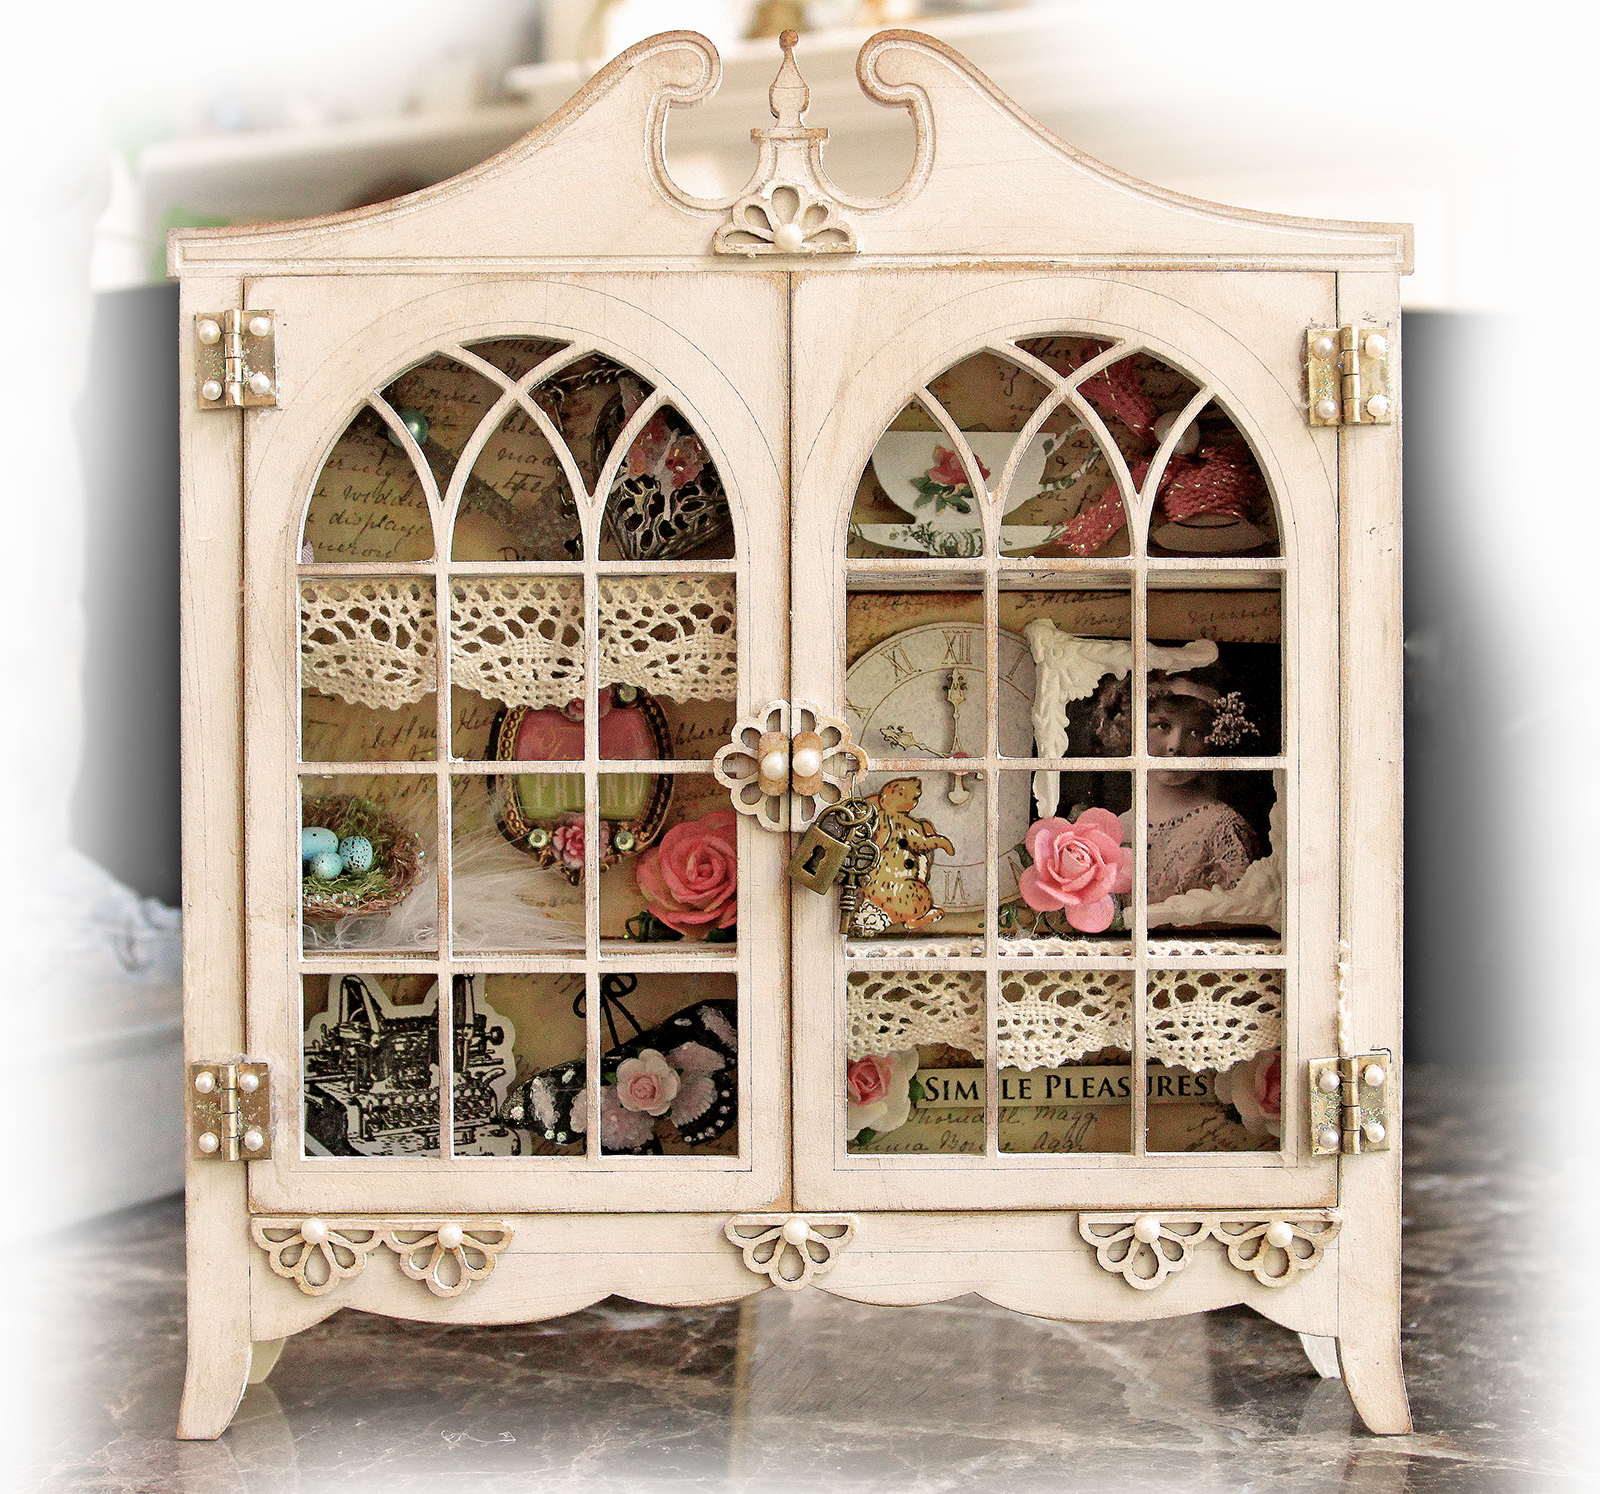
I took the Scrapmatts CB7011 Memory Cabinet 01, and mixed acrylic paints to get a wonderful creamy color, then painted the whole cabinet. I then sanded it in areas, especially on the edges to bring out the brown undertone that the cabinet originally came in giving it that Shabby Chic look that I love so much. I then took some pieces from the  CB4060 Ornate Frames 17  set and added them in place to get an ornate look. The little brass hinges and knob pieces came with the cabinet, and I added them onto ornate pieces and added little pearls to them, and then added a metal lock and key to the handle.


Here you can see some of the treasures I included. I used Graphic 45 A Ladies Diary Paper for the background on the shelves. There are Vintage lace pieces, a Vintage Image with little paper clay photo corners that I made myself, little hand tinted mulberry paper roses, a hand crafted butterfly from my Reneabouquets Etsy Shop along with lots of little odds and ends I have collected. Scrapmatts items included are:
A hand painted and decoupaged tea cup from the CB1141 Tea Set 01
A metal embossed key from the CB1017 Keys 01
A trim wrapped thread spool from the  CB1194 Sewing 02
A crystal accented CB6047 Clocks 01
A painted and seed bead accented CB1015 Butterflies 15


I created this layout to not only show off some of the Scrapmatts Chipboard, but also to show you some of the techniques that I like to use to bring my chipboard to life. This is a sweet layout I created that features a photo of my cousin Becky's little girl, Emmie holding hands and walking with one of her little friends, and I fussy cut the photo out and then got busy creating a magical scene around them. I used lots of pieces from past Scraps of Elegance Kits, as well as lots of Scrapmatts pieces. 


To create the look on the CB4058 Australian Federation Detail 03 , I first painted it with white acrylic paint, then I took some Smooch paint and randomly painted spots, and while the paint was still wet, I took a paper towel and rubbed it upward to get the variations in the paint color. I then took and tore chunks of fusable webbing, placed them randomly then heated them up with a heat gun to "melt" them to my chipboard.  I picked up this trick from a YouTube Video by Lindy's Stamp Gang that showed how to get a lace look using their fusable webbing, here is the link if you would like to check it out 


This picture shows a close up of the fusable webbing, I just love the texture that it adds to any project.


Here I took the CB5100 Grass 02 and CB5099 Grass 01 chippies and first misted them green, then I added liquid glue to the cattail heads and then dipped them into seed beads to get lots of yummy texture, then I took some glitter paints and randomly brushed them onto some of the top edges of the grass stems.


The "tree branch" is  CB5056 Twigs 02 that I first misted then edged in glitter paint, added some sweet little flowers, a bird nest and then tucked a CB1188 Birds 06 into. 


I created the look of a stepping stone path with a twist using lots of CB1198 Scrapwords 06, and surrounded it with lots of flowers, a journaling piece with another one of those little CB1188 Birds 06, and a couple of Lavender Ice Butterflies from my Reneabouquets Etsy Shop.


Here is a side shot so that you can see all the dimension.

And last but not least, I have first a card that I created:


Scrapmatts Used:
CB6050 Clocks 04
Pieces From The CB4060 Ornate Frames 17 Set

And a Tag:


Scrapmatts Used:
CB1192 Scrapwords04
CB3007 Tags 03
CB1015 Butterflies 15

I hope that you have enjoyed all my work with the Scrapmatts Chipboard pieces. I so enjoy getting to work with all the different and unique pieces that Sofie sends me, as well as with all the other talented girls on the Design Team. Thank you for joining me and , I hope you get to take the time to do something creative! Hugs, ~Renea


Friday, April 26, 2013

Scraps Of Darkness April Design Team Reveal With The Remember When Kit


Scraps of Darkness has revealed it's April Kit and now it is the Design Team's turn to show off their creations with it!!

The kit is loaded with the latest Bo Bunny Mama Razzi 2 and Kaisercraft products, and is so perfect for capturing those candid memories.


Love this gorgeous sketch done by our very own sketch artist Charlotte Jenkins (Suepup)!! She makes putting together that first layout a breeze with her wonderful inspiration.


This is my take on the sketch that features some fun photos that I snapped of my son Draven outside one day when he was around 8 years old. That was 10 years ago!!! It is so hard to believe that he is about to turn 18.


I started with a piece of Bo Bunny paper from the kit, and did some background stamping on it. I used the corrugated piece from the kit to form a "memo board" that I could hang some of my favs from that day on.  The paper clips and buttons were from the Embellishment Add On and the stickers on the photos were from the Kit. I used some of that Yummy Art Anthology dimensional paint from a past kit to get all that texture and shiny color.


Here I layered in paper banners from the kit and chipboard banners from the Embellishment Add On, then took a Scrapmatts Film ATC from my DT stash and 2 toned painted it with the Tim Holtz Distress Paints from the Color Add On, placed a Bo Bunny Sticker from the Kit into the middle, then added on some flowers from the Flora & Fauna Add On.


I added a second Scrapmatts Film ATC and added more F&F flowers and a piece from the Embellishment Add On. Here you can see all the dimension and textures I created. 


A side view to show off the dimension and details.


I have to admit, I love Bo Bunny products because they are one of the few manufacturer's who offer up products that allow us to not only scrap our girls, but our boys as well :) I love that I can pull off a layout like this one with "no flowers", and still have lots of detail, dimension and texture. This layout features a photo of my son that he recently took of himself. So uncool to have mom following you around with a camera now-lol! Although, I do sneak in a few here and there ;)


I did lots of fussy cutting, layering, stamping and misting. The tag that you see behind the canvas piece and the one that is on the side both pull out for hidden journaling. 


Here you can see where I did lots of edge cutting on the papers and then layered and folded them for lots of dimenstion. I tucked in lots of little sticker pieces from the kit, the buttons all over the layout are from the Embellishment add on, and the dates on the tag, the design and sentiment on the photo and some of the background design are all Bo Bunny Rub Ons from the kit. 


I don't like to waste, and that little masked and stenciled canvas tag pocket behind the photo is a left over from a mini album I made and all the tie offs you see are pieces of burlap fray that I save as I fray the ends of my burlap pieces I use on my layouts ;)


Here you can see all the dimension that all that layering gives my layout.


When I opened up the kit and saw the rustic look, Kaisercraft Papers in the kit, the Spellbinders Heart in the Creativity Add On, and the Doily Stencil in the Color Add On, I immediately thought of this photo that my cousin Chrissy's daughter, Kayleigh had pinned on Pinterest. I love this photo and journaling. It reminds me so much of so many of the strong women in my family. It reads;
The Country Girl
She's strong willed and independent.
She's as beautiful inside as she is outside.
She will never take no for an answer;
and when she is told she can't do it because she is a girl,
She'll prove you wrong every time.
She loves the thrill of the ride,
and the romance of adventure.
She's you and she is me.
Most of all,
She just is.


The Spellbinder's Heart from the Creativity was painted using the Vintaj Pantina's from the kit and then I added seed beads to the small center heart. 


Here you can see a close up of the masking I did with the Kaisercraft stencil from the Color Add On. I used Art Anthology Dimensional paint from a past kit  to paint the base layer, then misted it with some Art Anthology mist from a past kit.


The side layers were water distressed and edge painted with Art Anthology Paints, then I added on lots of flowers from the Flora & Fauna Add On, some beaded foliage pieces from a past kit, some burlap ribbon from a past kit, some Baby's Got The Blues Butterflies from my Etsy Shop, and the little horse was fussy cut from the Spellbinder's ephemera papers in the Embellishment add on and then stained with Tim Holtz Distress Stains.


I used Chipboard Chicken Wire tucked into places on the layout for a rustic look, and here I added on more flowers from the Flora & Fauna Add on.

I just love all the different, creative and unique items that Mel packs into a kit and it's add ons. You always discover something to spark your imagination and take it in so many different directions. No matter what your style, or if you like to keep it on the page or take it off the page, you will find the Scraps of Darkness kits limitless, and with all the goodness packed inside, you will find yourself reaching over and over to use the quality, cutting edge products. 

I so hope you find the time to create this week, or at least the time to do something that you love. It is those little things that enrich our lives and bring us happiness~ Hugs~Renea


Tuesday, April 16, 2013

Scraps Of Darkness/Scraps Of Elegance Round Robin Kick Off!!

Happy Tuesday everybody!! Over in the Scraps Of Darkness / Scraps Of Elegance forums, we are kicking off the Round Robin!!!! Lisa N (aka Raining) is our host and if you have never played, I encourage to find one somewhere and do so, it is so much fun to lift or be lifted and see what your teamies come up with.

I am on Team One this month with the sweetie Monica (mmlsweet) and the lovely Mel (Melinda Kelly), and can't wait to see what they do with my inspiration.

I love the so many different art forms and one of them is the Ballet, or really almost any kind of Dance.  I created a layout using the March SOD-Day Glo kit and lots of past kit embellishments. It features a Vintage New York City Ballet photo that was taken by the famous photographer, Annie Leibovitz, and is titled "In The Moment".  I also used the quote "Dance is the hidden language of the soul" By Martha Graham as inspiration and for my journaling. 


I did lots of tearing, and distress punching. I also did lots of script stamping, and even stamped over my photo with it to emphasis "the hidden language" of dance. The Pink Lemonade Crush Butterflies are from my Reneabouquets Etsy Shop.


Here you can see where I tore the paper, tucked in lace pieces, added flowers, and stenciled using course texture paste. I then subtly painted ink over the design to bring it out more.


There is cheesecloth details and seed beads for added texture and depth.


I did some fussy cutting to create the acrchitectural piece. and then used some Prima resin pieces that I inked up for details.

Thanks so much for stopping in!! I hope that you find the time to join in on a fun challenge, like the Round Robin, or a trade or swap. That is one thing I love about the Scrapbooking Community, there is always something challenging and fun going on :)  Hugs, ~Renea

Wednesday, April 10, 2013

Scraps Of Elegance April Kit-Possibility Reveal


Welcome to the April Scraps of Elegance Kit  Design Team Reveal!!
This month's kit is appropriately named Possibility, because  with all the gorgeousness packed inside of it, there are so many paper crafting possibilities!!!


This kit is loaded with the latest Bo Bunny C'est La Vie  and Carta Bella So Noted products.
New this month is a Color Add On and it is just super yummy!!


Each month the kit comes with a sketch designed just for it by Charlotte (Suepup), and the following is my layout that was inspired by it:

One possibility for this kit is to take it in the Mixed Media direction. I loved the blues in some of the papers and embellishments, and couldn't help but pull off a mixed media beach scene with them. 


This layout features lots of texture created using seed beads, burlap, tissue paper, sea glass, shells, stamping, and yes even some dry wall patch that was used to create the photo mat, and circular pieces. 


I am a huge fan of Bo Bunny papers, they are so nice and thick and perfect for the distressed, and layerlicious look I love! Items featured from the kit on this layout are:
Bo Bunny & Carta Bella Papers, Bo Bunny Noteworthy Pieces, Bo Bunny Rub Ons
Prima Crystals & Petaloo Flowers
From The Embellishment Add On:
Bo Bunny Stickers & Bo Bunny Brads
From The Flora & Fauna Add On:
Prima & Petaloo Flowers
And From The Color Add On:
Tattered Angels Chalkboard Mist-Inchworm


I used some Shabby Vintage Texture Roses From my Reneabouquets Etsy Shop, as well as some Sea Glass Butterflies to add texture and dimension.


Here you can see some of the detail work using the seed beads, pearls, and dry wall patch that was misted with the inch worm mist and then I added seed beads and glitter glass to it.


I love the Prima Chevron Crystals in the kit, they are so perfect for adding pattern and bling at the same time.


Here you can see some of the dimension as well as some of the natural textures of the sea shells, and sea glass, as well as the background stamping.


Another possibility for this kit is the Shabby Chic direction. I love the Shabby Chic/Girlie Grunge  look,  there is just something about that feminine meets rustic look that is just so appealing to me.  Here I took layers of the kit & Add On Papers and deeply distressed them, distress punched them, fussy cut, did some tearing and inked them. I also did some crackle distress painting and inking in the background behind the photo. 


The double circle frames are Scrapmatts Chipboard pieces from my DT stash, and the flowers are stash pieces and flowers from a past kit, that I inked the edges on. I added in misted cheesecloth and lace pieces for lots of girly, yet rough texture. 

I fussy cut out layers of papers from a sheet in the Paper Add On, and the then layered in some of the Noteworthy pieces from the kit, and rubbed on some of the Bo Bunny Rub ons to add detail.  I added Bo Bunny Brad accents as well as some hand dyed seam binding. The door lock is a Scrapmatts piece from my DT Stash accented with some gold pearls from a past kit.
Each month, I have the honor of getting to create butterflies for the kit, these Organza Butterflies were designed around the papers in this kit and can be found in my Etsy shop.


Here you can see the wonderful texture and aged look that the crackle painting and inking gave my papers.


Inking the edges of your flowers, can give them a whole new look. Here I inked my edges to give them a Vintage distressed look.


I love misting my cheesecloth to give it an aged look as well. 


And here is a final look at one of the possibilities for this kit, taking it off the page. I love doing mini albums. Something about taking a theme and creating pages around them, so appeals to my imagination. This mini has a Vintage sewing theme, and actually reflects my love of one of my FAV artists Andrea Ockey Parr. Andrea  is like me, she may not be a gifted seamstress, but because she grew up around so many wonderful seamstresses, she was greatly influenced, and has a deep love and affection for it.


The mini album is a canvas and chipboard mini. I used the Prima mask in the Embellishment add on to create the misted pattern you see throughout the album. I am in love with that stencil-so gorgeous. I then lightly misted the canvas to create the subtle color effect. 


Here you can see how fat my album is!! I used a stash zipper to create a closure that is held on the backside by Velcro.


**All Vintage Sewing Images are from Magical Moonlight Studios**
On the inside of the cover, I used the stencil and mist, then added some trim from a past kit. The My Romantic Butterfly is from my Reneabouquets Etsy Shop. I used a Bo Bunny Noteworthy to create the "Inspire" tag, and a Bo Bunny Brad wrapped with ribbon forms a handle that when you pull it:


Opens the flap up to reveal a journaling spot and an area for small photos.


This page features a lace pocket, with little tags that were created with a Bo Bunny Noteworthy piece, and a tag cut out of some of the kit paper. The rose image was a cut out from a past kit, and I added on a little sewing notion card with a safety pin and button from my stash.


This page features a Bo Bunny Sticker that I machine sewed around, some Vintage look lace trim, and small flower from a past kit. 


This page is a canvas page and features the Prima stenciling and misting.


On the back side I created a pocket by machine sewing one of the Bo Bunny Stickers on the sides and bottom, then created some little "tuck ins" from the Bo Bunny Noteworthy pieces, Bo Bunny Brads, and a little 7 Gypsies wire hanger. The Trim is from a past kit and the little button and hand tinted roses are stash pieces. 

This page features layers of kit and add on paper, a Bo Bunny Noteworthy piece with a Bo Bunny Brad, a head pin with ribbon, mulberry roses and a button.


I used the same format on the last page as on the first.
It also opens up:


To reveal a journaling and photo spot. 

Thank you for dropping by for a visit and for checking out my reveal day projects. I hope I have inspired you with some of the "Possiblilites" of  the direction that this month's kit can be taken in. I always love when my box arrives, I get to open it up, and oooooh and aaaah my way through it letting my imagination take me where it will~like a little kid in a candy store-lol!  Now, I am off to play some more~so until next time~Big Hugs, ~Renea